Helix Candles for Events: Real Flame and LED Candle Solutions for Weddings, Corporate Events & Private Celebrations

Guest article provided by helixcandles.com.

Lighting sets the tone for any event. Candles create warmth, elegance, and atmosphere in a way few décor elements can match. Whether you’re planning a wedding, hosting a corporate gala, or curating a private celebration, candlelight brings a level of beauty that feels intentional and refined.

Helix Candles offers high-quality solutions for both real flame and LED lighting. Their products are trusted across weddings, museums, galleries, and luxury events. Every venue has different needs and safety rules, which is why having versatile candle options matters. With Helix Candles, you get the right look without compromising on ambiance or safety.


Best Candles for Weddings and Private Celebrations

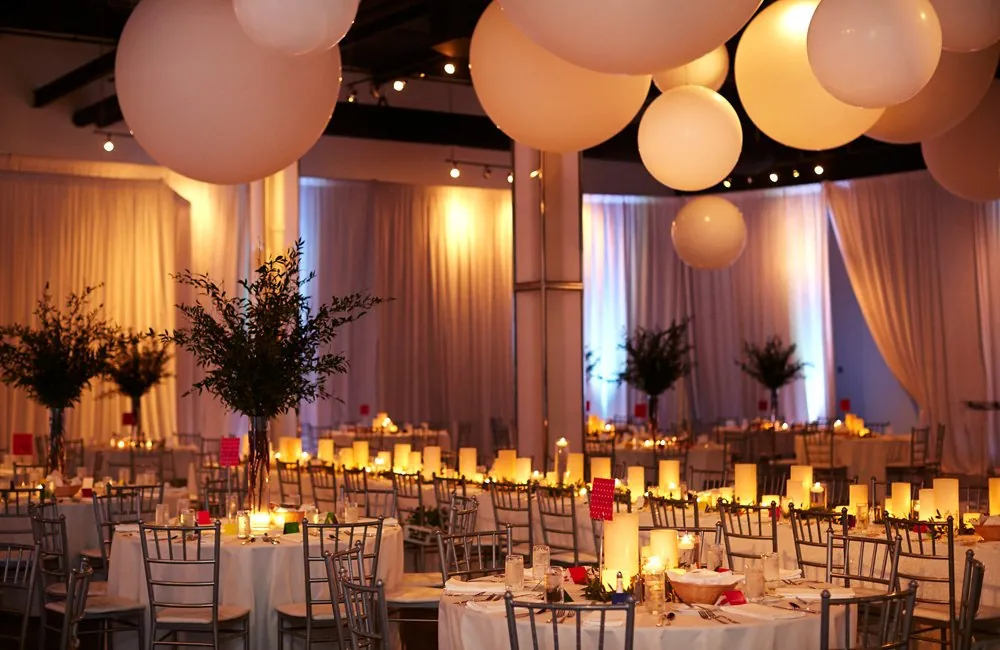
Candles are a must for weddings and intimate gatherings. They soften the room and add movement to the décor. Real flame pillars are the classic choice. They glow warmly and create a natural flicker that enhances the romantic mood.

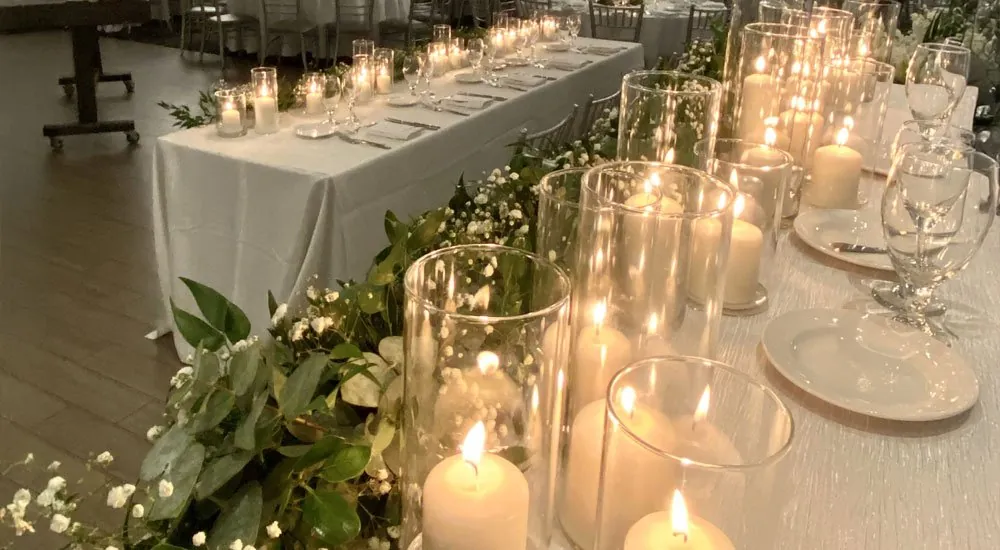
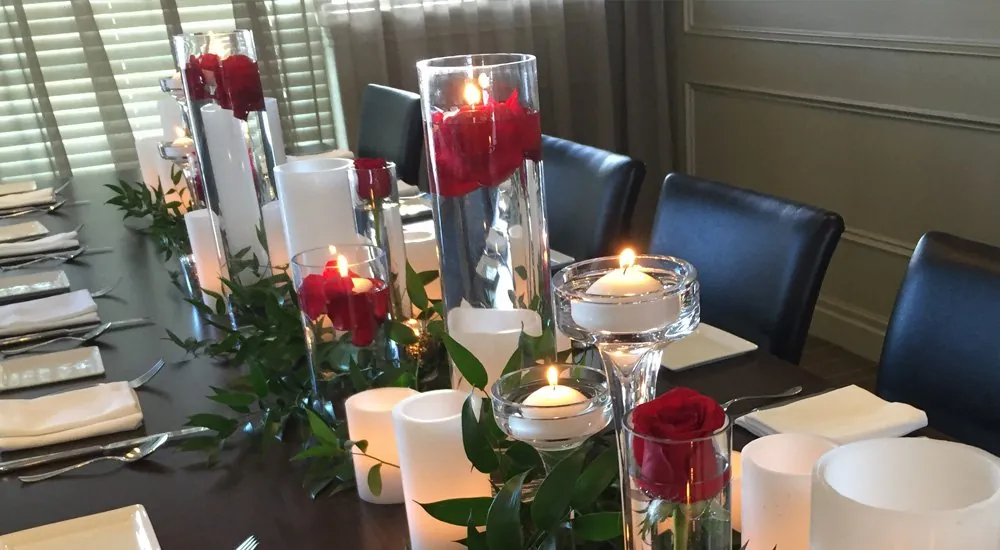
At weddings, pillar candles look best inside tall glass vases. This setup protects the flame from wind and keeps guests safe during the ceremony and reception. Floating candles also elevate the atmosphere. They shimmer across water and add dimension to long tables or lounge areas. Floating candles must always be placed inside a vase or wide vessel. This ensures stability and meets most venue guidelines.

Private celebrations benefit from the same approach. Dinner parties feel more luxurious with staggered glass vases and wax luminaries. Luminaries offer a soft, diffused glow that photographs beautifully. They also hide the candle, creating a polished look.

Some couples and families prefer LED candles. This is common when young children or elders are present. LED candles remove fire risk but still maintain the visual tone. You can use LED pillars, taper-style LEDs, or flameless tealights to fill lanterns or vases. Many clients blend LED and real flame to achieve full coverage, especially for outdoor settings where wind is unpredictable.


Corporate Events, Brand Activations, and Professional Settings

Corporate events need lighting that is reliable, sleek, and consistent. Candlelight creates a high-end feel that suits awards nights, dinners, and brand showcases. Real flame candles work well when venues allow it. Pillar candles in glass cylinders offer clean lines that complement modern décor.

Corporate planners often use floating candles for centerpieces. They add movement without taking attention away from branding or table elements. Floating candles must always sit inside glass vessels for safety and a polished look.

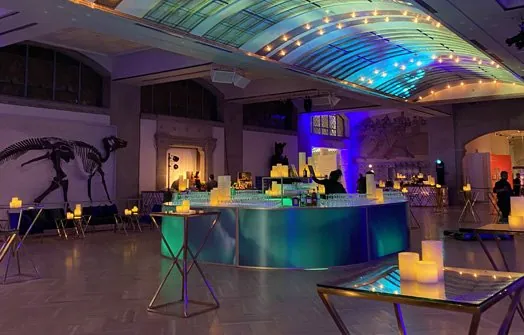
LED candles are widely used for professional events. Many corporate venues follow strict fire safety policies. LED pillars and tapers provide uniform lighting that stays “on” throughout long programs. LED candles are ideal for high-traffic spaces or events with interactive components. They also work well for outdoor installations, where wind could blow out real flame candles.

Galleries and museums also lean toward LED options. These environments protect valuable artwork and artifacts, so open flame is rarely permitted. LED candles provide soft light without heat or smoke. Wax-coated LED pillars mimic real candles and blend seamlessly into curated displays.

For galas or fundraising nights, designers often combine hundreds of LED candles to create dramatic visual runs. LED tealights can be placed inside frosted holders or luminaries to add depth along walkways or stage edges.


Choosing the Right Candle for Your Venue and Safety Needs

Every event space has unique rules. Some allow real flame, but only when the candle is enclosed in a glass vase or luminary. Others allow floating candles but require the water level to be high enough to protect the flame. Many venues restrict open flame entirely. This is common in heritage buildings, government spaces, and indoor galleries.

Real flame candles offer unmatched beauty. The gentle movement of natural fire brings life to table décor and architectural details. For safety, pillars should always be inside glass cylinders of the correct height. Floating candles must sit inside clear vases or bowls. Wax luminaries are another safe real flame option. They enclose the candle inside a thick wax shell and create a soft, glowing effect.

LED candles remain the safest and most flexible option. They are ideal for events with children, elders, or heavy foot traffic. LED candles stay lit all night. They work indoors and outdoors. They fit inside lanterns, glass vases, and luminaries without any concern about heat. For venues with total fire bans, LEDs let you keep the candlelit look without breaking rules.

Hybrid designs are becoming popular. For example, planners may use real flame on elevated tables and LED candles near doorways or high-traffic aisles. This blends ambiance with safety and meets venue requirements.


Conclusion

Candlelight transforms events. It brings emotion, warmth, and style to weddings, corporate functions, private dinners, galleries, and museums. Choosing the right candle type matters. Real flame pillars and floating candles create classic beauty when safely enclosed in glass vases or wax luminaries. LED candles offer an ideal alternative when venues restrict open flame or when extra safety is needed.

Helix Candles supports every type of event with high-quality solutions. They offer both real flame and LED options designed for safety, elegance, and impact. Whether you need hundreds of pillars, floating candles, or a full LED setup, Helix Candles has you covered. Their lighting enhances any atmosphere and helps every event shine.

Photos By Helix Candles

DIY Embroidery Hoop Christmas Ornaments

Make your own DIY Mini Embroidery Hoop ornaments using this simple and easy tutorial. Making these are so much fun and take less than 5 minutes to make. #minihoopornaments #embroideryhoopornaments #diychristmasornaments

These DIY Embroidery Hoop Christmas Ornaments are super fun and easy to make. Using these mini embroidery hoops you can create the cutest ornaments for your Christmas tree. Use the full tutorial below to learn how to create your own or watch the video on how I make these in less than 5 minutes.

I love DIY ornaments. In fact, they are some of my most favorite ones to hang on my tree. So when I made these DIY Embroidery Hoop Christmas Ornaments, you can say I probably went a little crazy.

I put together a quick 5-minute video showing you exactly step by step how I made these ornaments. Plus, I created the SVG cut files for you to download from the Resource Library so that you can create your own.

How to make Embroidery Hoop Ornaments:

Once you have all the supplies you will need to set up an area to create your ornaments. The dining room table or your craft table is a great place. I like to use the table from my Scrapbox Workbox craft storage cabinet. I love this cabinet very much!

My video above shows me creating these within my Scrapbox Workbox craft storage cabinet.

Materials Needed:

You will need to gather up about 5X5 inches pieces of fabric. You will need one fabric square for every one ornament you create.

You will also need the miniature-sized embroidery hoops. I like to get these and they come very quick!

Next, you will need heat transfer vinyl, you can use scraps, or if you are making 10-12 ornaments you might be able to get all 12 designs onto one sheet of heat transfer or iron-on vinyl.

Lastly, you will need some greenery and berries for embellishment. I like to use boxwood greenery wire. It’s very inexpensive, and you get a lot for the money. You can also use tiny poms such as these for the berries.

Once you have everything, simply press the design onto the fabric, and remove the plastic protective layer. Then, put the fabric square into the hoop. Fold over and hot-gue the remaining fabric edges on to the back of the hoop to secure it in place.

Using about 6 inches of boxwood twine, fold in the outer edges, and hot glue in place at the top center of the wreath. Then, glue 3-5 red poms on the greenery to create the berry look.

Add twine to the screw piece at the top of the embroidery hoop so that you can hang it from your tree. You’re all set! Hang from your tree and create as many as you like.

What do you think? These DIY Embroidery Hoop Christmas Ornaments would also be great to go along with gift tags on gifts or presents.

Source: Crafty Life Mom

How to Knit a Sweater

By Sarah E. White

Ball Of Wool With Knitting Needles And Sweater
Stephanie Leong / EyeEm / Getty Images

Knitting a sweater is one of the pinnacles of the hobby, and it’s one that stops some new knitters in their tracks. A sweater seems like such a big project that will take a lot of time and skill, so often knitters are too intimidated to take on the challenge.

It certainly can be all those things, but there are sweater patterns out there that newer knitters can do and that don’t include a huge time commitment. Here are the basic skills you need, some good patterns to try, and details to get you started.

Essential Skills for Knitting a Sweater

Before you knit a sweater, there are a few knitting skills you should have under your belt. You should be comfortable with casting on and binding off, as well as forming the knit stitch.

Purling comes in handy, too, if you’re knitting your sweater flat or if it has ribbing or a textured stitch pattern. Depending on whether your sweater is knit top-down or bottom-up, you’ll need to know the basics of increasing and decreasing.

You should be comfortable with reading a basic knitting pattern and deciphering knitting abbreviations. Though skill level is relative, understanding the skill level listed on a pattern can be helpful when choosing a first sweater pattern.

Easy Sweaters for Beginners

If you’re a little nervous about knitting an adult-sized sweater, you can always start by knitting for a baby or child. Little sweaters contain all the same skills as bigger ones, but they’ll finish faster, giving you more confidence in a shorter period of time.

This basic baby sweater, for example, is a great first sweater because it’s all Garter Stitch and there’s hardly any shaping at all. It’ll knit up in no time, and if you don’t know a baby, it’s a great charity knitting project.

This child’s cat sweater is super cute, too, and you don’t have to put the cat on the front if you want a plain, straightforward knit to practice on.

If you’re looking elsewhere for sweater knitting patterns, look for projects in garter stitch, Stockinette, or other easy stitch patterns. You can choose a circularly knit project if you’re comfortable working in the round; then you won’t have to worry about finishing. Heavier weight yarns make a project go faster and the stitches are easier to count and see, so they are a good choice for beginners.

Don’t choose a project you don’t like just because it’s easy. You want to be able to wear and enjoy your first sweater!

There are many great books and courses to help people knit their first sweaters, such as “My First Cardigan Workbook,”by Georgia Druen, and “The 30 Day Sweater Book,” by Lacie Lynnae.

Be Honest About Gauge

When you knit your first sweater, it may be the first time you really have to take gauge seriously. When knitting pieces that are designed to fit a body, you need to get accurate gauge so they’ll come out the size the designer intended.

Take the time to swatch, wash your swatch as you will wash your sweater, and measure your swatch honestly. Reknit on different needles if you need to. Even though you’re excited to get started and these steps take extra time, making sure you have the correct gauge is worth it as you’ll end up with a sweater that fits.

Finishing Matters

Once you’ve taken all the time needed to get gauge and knit all the pieces your sweater requires, take a little more time to sew your seams properly. Mattress stitch is essential for sewing side seams, while a horizontal seam works to join bound off stitches together, such as shoulder seams. The right finishing can make all the difference in having a sweater you’re proud to wear versus one that lives in the back of the closet.

Source: The Spruce Crafts